Migrating a Legacy App to Cloud Native — Part 3

I'm a Consulting Software Engineer, Software Architect, and AWS Solutions Architect with over 34 years of experience. My specializations include AWS serverless application development, IoT, and webapps.
I performed too well growing with the Cloud Native application development practice of a Premier AWS Consulting Partner, and got myself promoted to management. 😔
Now I'm returning to my true self as a full spectrum software engineer and cloud technologist; from discovery to delivery and everything between.
This is part 3 in a series. If you haven’t been following it before now, at least read part 2 before proceeding:
Now that the planning has concluded, it’s time to move on to the real work. This is where I start running into problems, and unlike many blogs that paint some tool that they are promoting as all flowers and sunsets, I’m going to be talking about problems as well as the successes. No tool, framework, or process is a silver bullet that works perfectly and can be applied to every project. AWS and Amplify are amazing, and sometimes a pain. With that, let’s begin…
Step 1: Move Code to GitHub
My legacy project (SqAC) was closed source and hosted in a private repository on BitBucket. Upon starting this series, I knew people would want to see the code I was talking about but don’t want my actual application copied. It already had a copyright and terms of service, and I decided to retain full copyright on the application and the one service with the guts of the business logic. The rest of the individual files though make no mention of copyright and although they are still technically covered under copyright law, you are welcome to copy and reuse bits that you find useful.
The project is now here on GitHub. You can follow the changes via the pull requests.
Step 2: Setup Amplify
Since SqAC is an Angular app, I started with the instructions at https://aws-amplify.github.io/docs/js/angular. Those instructions skip the part about creating an AWS account and configuring your command-line environment to access the account. That is needed before your first amplify init command.
To get started, you can create a new AWS account by going to https://aws.amazon.com and clicking on the Complete Sign Up button. I already had an AWS account that was just being used to make backups to S3 from the existing implementation. I considered creating a new account to restart my 12 month free trial, but decided against it for the sake of this experiment. I want to see what the actual monthly cost to run this application under Amplify will be, not skewed by temporary savings.
Logged into the AWS Console (in browser), I could then use the Amplify CLI: amplify configure
This step isn’t mentioned anywhere on the Angular guide, but there is a nice video on the Quickstart page. This is a small flaw in the documentation; some important information is in the generic documentation and some is in the framework specific (Angular, React, Vue) sections. You have to read both and weave them together to get a complete picture. This is a pain, but granted getting this sort of documenting right is hard.
Moving on, amplify init went smoothly. 🎉
Next was amplify hosting add to add dev web hosting of the project, and amplify publish to build and copy the web app to an S3 bucket with publish access.
$ amplify hosting add
? Select the environment setup: DEV (S3 only with HTTP)
? hosting bucket name sqac-amplify-20190817123020-hostingbucket
? index doc for the website index.html
? error doc for the website index.html

You can now publish your app using the following command:
Command: amplify publish

$ amplify publish
This created an S3 Bucket, built my application, and uploaded the results to the bucket. Once complete, a new browser tab opened at http://sqac-amplify-20190817123020-hostingbucket-dev.s3-website-us-west-2.amazonaws.com showing my application, with a failed attempt to Authenticate under the old code. 👍
Stacks of rules, policies, buckets and services where set up with just two commands. This. Is. Awesome! 🤩
See all the changes made for this part in my first pull request.
Step 3: Setup Authentication
The obvious next thing was to be able to create accounts, sign-in, and sign-out. No data (storage) yet, just one step at a time.
The instructions for setting up auth are limited, despite the plethora of questions the CLI asks. (Just enter amplify add auth and… magic?) In particular, the question “Enter your redirect signin URI”. Err. Not sure. My app isn’t running yet. This blog post by AWSer Nader Dabit provides actual details. It seems the answer to the prompt is http://localhost:4200/#/home/account/, because that’s the local dev server’s URL to the account page where I want to return users to after login.
Then I hit this question, which isn’t in Dabit’s blog post:
Select the OAuth flows enabled for this project. (Use arrow keys)
❯ Authorization code grant
  Implicit grant
Searches for this exact question turned up people selecting the first (default) option with no explanation. So I searched more generally, and was taken to the OAuth 2.0 spec on Implicit Grant, which basically says: don’t use this. Very well; Authorization code grant it is! Here’s the complete run:
$ amplify add auth
Using service: Cognito, provided by: awscloudformation

 The current configured provider is Amazon Cognito.

 Do you want to use the default authentication and security configuration? Manual configuration
I knew the default authentication used a username, and I wanted users to login by email address. Thus Manual configuration...
Select the authentication/authorization services that you want to use: User Sign-Up, Sign-In, connected with AWS IAM controls (Enables per-user Storage
features for images or other content, Analytics, and more)
 Please provide a friendly name for your resource that will be used to label this category in the project: sqacauth
 Please enter a name for your identity pool. sqac_amplifyf81356f4_identitypool_f81356f4
 Allow unauthenticated logins? (Provides scoped down permissions that you can control via AWS IAM) I want to learn more.

If you select 'yes', your identity pool will provide temporary AWS credentials for unauthenticated guest users.

 Allow unauthenticated logins? (Provides scoped down permissions that you can control via AWS IAM) Yes
 Do you want to enable 3rd party authentication providers in your identity pool? I want to learn more.

If you select yes, your identity pool will support users who are authenticated via a public login provider such as Facebook, Google, and Amazon (non-Cognito).  Your identity pool will continue to support users who are authenticated via a user pool.


 Do you want to enable 3rd party authentication providers in your identity pool? No
 Please provide a name for your user pool: sqac_amplifyf81356f4_userpool_f81356f4
 Warning: you will not be able to edit these selections.
 How do you want users to be able to sign in? Email
 Multifactor authentication (MFA) user login options: OPTIONAL (Individual users can use MFA)
 For user login, select the MFA types: Time-Based One-Time Password (TOTP)
These are mostly default options. I did select the sign in by Email though, and also optional TOTP, because every site should offer MFA, but I don't want it to be a barrier to entry.
Please specify an SMS authentication message: Your SqAC authentication code is {####}.
 Email based user registration/forgot password: Enabled (Requires per-user email entry at registration)
 Please specify an email verification subject: Your SqAC verification code
 Please specify an email verification message: Your SqAC verification code is {####}
 Do you want to override the default password policy for this User Pool? No
 Warning: you will not be able to edit these selections.
 What attributes are required for signing up? (Press <space> to select, <a> to toggle all, <i> to invert selection)Email
 Specify the app's refresh token expiration period (in days): 30
 Do you want to specify the user attributes this app can read and write? Yes
 Specify read attributes: (Press <space> to select, <a> to toggle all, <i> to invert selection)Email
 Specify write attributes: (Press <space> to select, <a> to toggle all, <i> to invert selection)
 Do you want to enable any of the following capabilities? (Press <space> to select, <a> to toggle all, <i> to invert selection)
I added my app name to the default email strings, and allow the app to read the Email attribute.
Do you want to enable any of the following capabilities? (Press <space> to select, <a> to toggle all, <i> to invert selection)
 Do you want to use an OAuth flow? I want to learn more.

When you create a user pool in Amazon Cognito and configure a domain for it, Amazon Cognito automatically provisions a hosted web UI to let you add sign-
up and sign-in pages to your app.


 Do you want to use an OAuth flow? Yes
 What domain name prefix you want us to create for you? sqac
 Enter your redirect signin URI: http://localhost:4200/#/home/account/
? Do you want to add another redirect signin URI No
 Enter your redirect signout URI: http://localhost:4200/#/home/account/
? Do you want to add another redirect signout URI No
 Select the OAuth flows enabled for this project. Authorization code grant
 Select the OAuth scopes enabled for this project. Email, OpenID, Profile, aws.cognito.signin.user.admin
 Select the social providers you want to configure for your user pool: (Press <space> to select, <a> to toggle all, <i> to invert selection)
I didn't want to create my own sign-up and sign-in components, so I selected Yes to OAuth. (This turned out to be a mistake - as I point out later.)
? Do you want to configure Lambda Triggers for Cognito? Yes
? Which triggers do you want to enable for Cognito Learn More
Additional information about the triggers available for Cognito can be found here: https://docs.aws.amazon.com/cognito/latest/developerguide/cognito-user
-identity-pools-working-with-aws-lambda-triggers.html
 Which triggers do you want to enable for Cognito (Press <space> to select, <a> to toggle all, <i> to invert selection)
Successfully added resource sqacauth locally

Some next steps:
"amplify push" will build all your local backend resources and provision it in the cloud
"amplify publish" will build all your local backend and frontend resources (if you have hosting category added) and provision it in the cloud
Above I originally said yes to Lambda Triggers, but then when given the options I didn’t select any. The run then completed, with some suggested next steps. 👍
I did the suggested amplify push, and it failed!
CREATE_IN_PROGRESS OAuthCustomResourceInputs                                 Custom::LambdaCallout      Sun Aug 18 2019 10:26:23 GMT-0700 (Pacific Daylight Time) Resource creation Initiated
CREATE_FAILED      OAuthCustomResourceInputs                                 Custom::LambdaCallout      Sun Aug 18 2019 10:26:23 GMT-0700 (Pacific Daylight Time) Failed to create resource. See the details in CloudWatch Log Stream: 2019/08/18/[$LATEST]aa2cac0c6491465c82e73e4934b63bb3
CREATE_FAILED      sqac-amplify-dev-20190817121515-authsqacauth-WOW6AXV1C4UK AWS::CloudFormation::Stack Sun Aug 18 2019 10:26:24 GMT-0700 (Pacific Daylight Time) The following resource(s) failed to create: [OAuthCustomResourceInputs].
If the goal of Amplify is to make setting up cloud infrastructure easy enough for a front-end developer to do it, it failed here. If I had selected the default configuration in the first prompt, then it would have been simpler. Simply because I wanted to have users sign-in via email instead of user name though, I was taken down a whole lot of complexity. Many of these questions are beyond someone without experience with Cognito. A failure message like above would leave a developer with limited AWS experienced staring blankly at their terminal.
Digging down through CloudWatch, I found the error which goes right back to the original question I was unsure on from the CLI:
"message": "http://localhost:4200/#/home/account/ cannot use fragment",
  "code": "InvalidParameterException",
Sigh.
$ amplify update auth
Please note that certain attributes may not be overwritten if you choose to use defaults settings.
Using service: Cognito, provided by: awscloudformation
 What do you want to do? Add/Edit signin and signout redirect URIs
 Which redirect signin URIs do you want to edit? http://localhost:4200/#/home/account/
? Update http://localhost:4200/#/home/account/ http://localhost:4200/
 Do you want to add redirect signin URIs? No
 Which redirect signout URIs do you want to edit? http://localhost:4200/#/home/account/
? Update http://localhost:4200/#/home/account/ http://localhost:4200/
 Do you want to add redirect signout URIs? No
Successfully updated resource sqacauth locally
Nice, although I don’t think these URIs are even used without federated login. Looking back through the CLI interactions, I probably should have answered No to the question “Do you want to use an OAuth flow?” Apparently that is for Cognito hosted pages for sign-in. I'm going to use the Amplify component on my own application page. I don't see a way to use OAuth flow without the 3rd party identity providers, so why does it even ask this after I answered no to those 3rd party providers?
Step 4: Integrate Authentication into the App
Now that I have Cognito set up, I need to integrate it into my app. The Angular setup instructions at https://aws-amplify.github.io/docs/js/angular are pretty thorough. 👍 It took me most of the way to success, but there were a couple of complications…
First, was this:
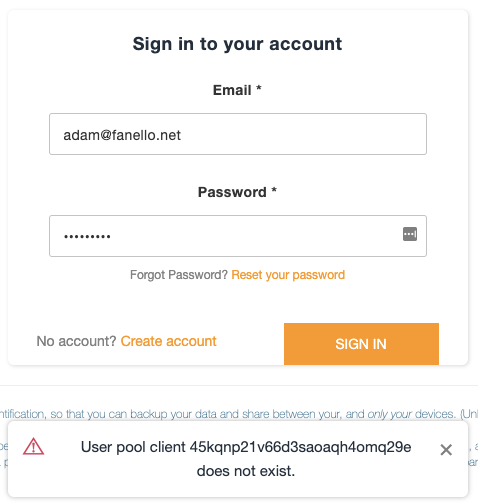
Indeed that was the pool client ID in my aws-exports.js file; but it didn’t match either client ID in Cognito. (Yes, either. I can find no explanation of why Amplify creates two Cognito app clients identical in every way but that one is named ending with “client”, and the other ending in “clientWeb”.)
Comparing to Cognito in the AWS Console, it turned out that the content of aws-exports.js was completely invalid. Amplify documentation says this file is generated upon an amplify push, but a push simply told me “No changes detected.” I finally tried an amplify init, changing nothing, and that generated a new aws-exports.js with the proper content. I never figured out how this became out of sync.
The next complication was styling. The image above shows the Amplify authentication component styled all pretty in orange. The Amplify for Angular documentation tells me to import ~aws-amplify-angular/Theme.css into my app’s top-level style.scss. That gave me the sign-in theming, but made a mess to text in many other parts of the app. For example:
It turns out the Amplify stylesheets make global changes to styles, including to body, h1 through h5, span, and p! Many of the class selectors are prefixed with “amplify”, but there is a bare .tooltip selector that has a good chance of interfering with your app as well. The problem has been reported as issue 2750, with the fix tied up in a complete refactor of components that is far from complete. After a fair amount of experimentation I found that adding the following in my styles.scss, in place of the suggested import, and wrapping my use of the Amplify authentication component with a <div class=”amplify-block”> fixed things up:
@import "~@aws-amplify/ui/src/Theme.css";
.amplify-block {
   @import "~@aws-amplify/ui/src/Angular";

 .amplify-container {
       padding-bottom: 2em;
   }
}
Beyond these challenges though, the Amplify authentication component did save me from having to deal with any actual coding to add sign-up (including emailing a verification code), sign-in, or sign-out to my application. A bit of configuration, and it was there. This is a real time saver. 👏 (On the downside, I selected to allow users to use TOTP, but see no means to enable this in the U/I.)
Step 5: Adapting the application code
Once the Amplify authentication was in place, I needed to adapt my application logic to respond to sign-in, sign-out, and pull the user attributes out of the Cognito user and into the object used by the rest of the application. This is where I ran into the next complication…
Angular is written in Typescript and so is the Amplify Angular library, yet it uses type any all over the place, killing any benefit of Typescript. (Type any is the data type that roughly translates to ¯\_(ツ)_/¯.) Thus I was reduced to doing console.log to discover the properties of objects.
Once the typing was figured out though, it wasn’t hard. In fact, if this were a fresh application it would have been very simple. As a migration, the translation into the existing logic took a little figuring out but it was still about as easy as it could possibly be. The basics are to inject the AmplifyService, then subscribe to authStateChange$ in that service to check for the state changing between “signedIn”, and any other value. You can find the details in the changes to user.service.ts in the pull request for this part.
No Social Login Yet
I originally configured auth for social providers via Google and Amazon Login, but became stuck trying to configure it. Setting up for Google credentials was failing claiming that the amazoncognito.com domain wasn’t authorized, even though I authorized it. I found instructions in Amplify’s documentation to be a bit jumbled when trying to follow along. Ultimately, I decided that social login isn’t needed on my first pass, and decided to stick with the basics. I hope to circle back and get this working later, probably after the initial production deployment.
Coming next time…
In part 4, I’ll add private and protected storage to the application.